ThingLink

November 9, 2013

I've been seeing 'ThingLink' talked about a lot on my Twitter feed, but hadn't really seen how I could use it in my teaching. For those who don't know, ThingLink allows you to create pictures with interactive tags on them.

This week I needed to set up two new classes on Edmodo, as my year 9 classes had rotated round to new teachers. Last time the pupils had difficulty remembering how to submit their prep after they had gone home, so I made a ThingLink using a screen shot of the turn in page to help them. I was surprised, not only by how quick and easy it was to make a ThingLink, but by how much my pupils enjoyed using it.

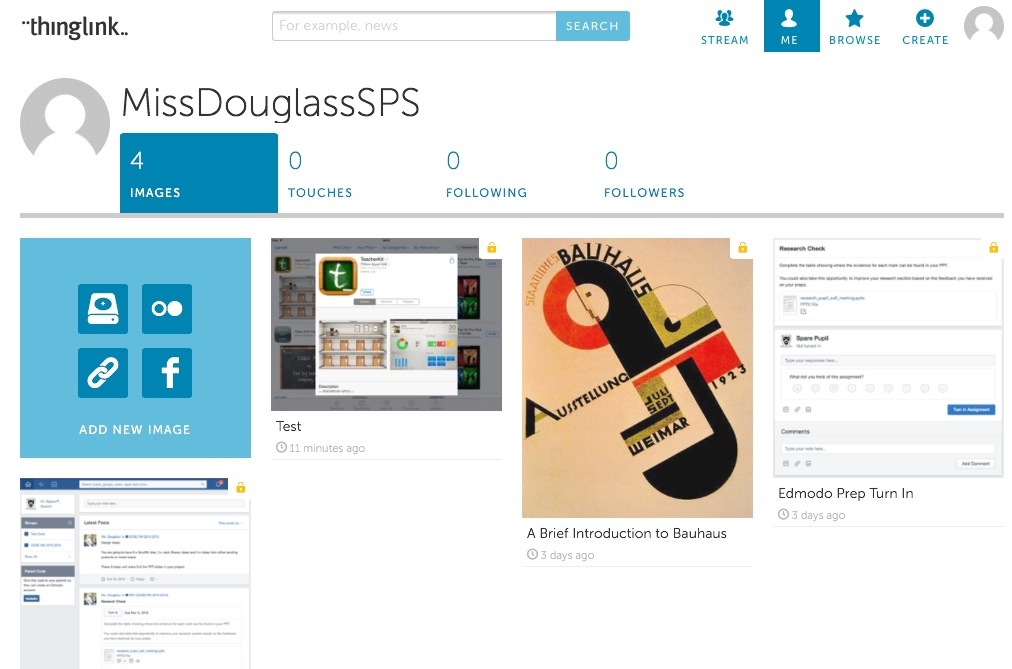
So here is a quick tour or ThingLink, there is a very good website and also an app (which doesn't quite have the same functionality but still works fine)

They have an educator account, and you can choose if you want your ThingLinks to be publicly available, or private (you can still embed or share with a link if it's private).

Website
App
All of your created ThingLinks are easily available on both the website and the app. You can easily edit them whenever you want.
To create a ThingLink, all you need to do is:

Choose an image (from camera roll in the app, or by uploading an image in the website).

Tap wherever you want a tag to appear. On the website you have more choice of tag icons, but in the app you can easily add pictures as tags. There are a huge range of tags you can use, but I tended to use video and websites (as well as old fashioned text).

When you've finished save your ThingLink (it uploads to the website) or choose your sharing options, you can also access these again through the website but I couldn't seem to find them again in the app.

You can then open your new ThingLink and see if the tags worked as you want them too, you can always go back and edit if you need too.

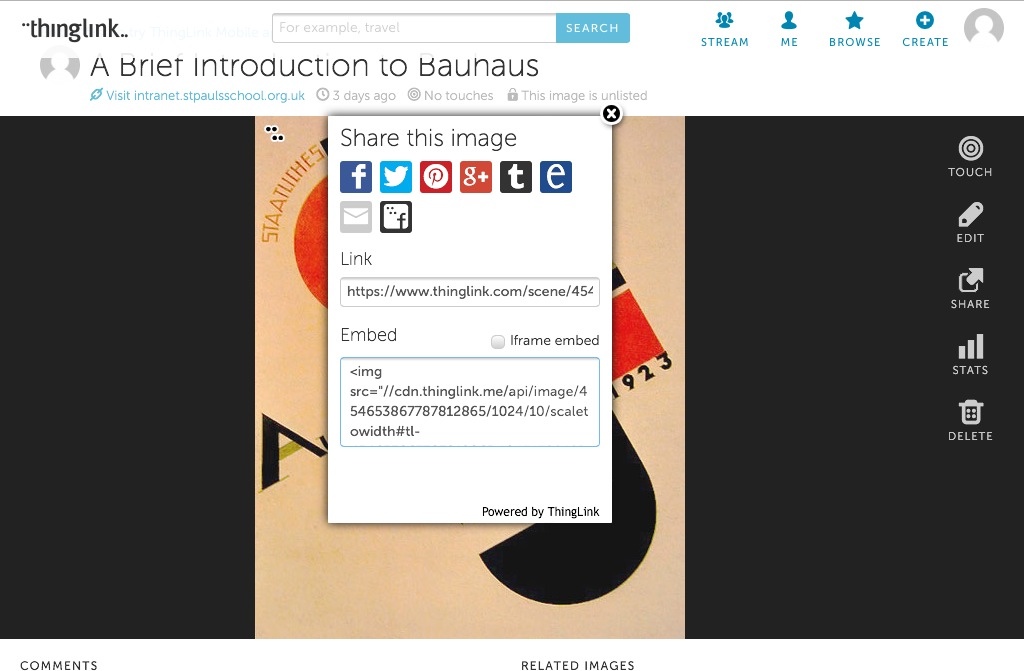
I was really impressed to find that one of the automatic embed options in a ThingLink was Edmodo, but you are also given an embed code so it can be out wherever you want. I embedded a ThingLink about the Bauhaus on my school intranet.


This is the finished Bauhaus ThingLink. Although it is very difficult to embed things on a WordPress blog, so currently it seems to not be working. I will keep investigating how to do it (it took me ages to work embedding Prezis!)


A Useful Little App

June 29, 2013

Please excuse the short post today, it’s the start of the summer holidays and I am very tired (and yet somehow have a very busy weekend).

A link to a design app appeared in my twitter feed this week. It is called Design Tools and is a very simple, yet effective, app.

It basically shows the sizes or values of digital and paper media (with a nice colour converter thrown in). This is quite a useful thing in my subject, especially when I am trying to look up the colour codes for my intranet pages.

It was very useful this week when I was making my business cards to hand out to new tutor parents (as the programme I was using didn’t have any templates).

A handy converter for resizing keynote slides to A4 paper (it’s how I make my handouts).

And the, previously mentioned, colour converter!

Simple, yet quite a useful little app.


Displays

June 1, 2013

For most schools this week has been half term. However in my school it’s exams week. So no lessons, just end of year exams for the Year 9s and 10s. This means that when I’m not invigilating I get to spend some time sorting things out.

One of the big things on my list for this year is to revamp the displays in our classrooms. Some of the things in there are from 1995! Although I have just realised that this must be an annual thing for me, because this time last year I posted about using QR codes in my new corridor display.

We have lots of notice boards, most of them are high up, or awkward shapes. Due to the nature of my subject, I don’t have much in the way of displayable pupil paperwork and photos of finished products don’t go very far. So I am trying to make some posters with interesting information for the pupils.

The first area I am tackling is the laser cutter room. My pupils love using the laser cutter and they frequently book a session to use it during lunch, in fact it is our busiest machine. So I thought I would start with a flowchart explaining how to check you have permission to use it.

I am using an app called Grafio, which is a nice easy way to make posters. There is also a ‘lite’ version,so you can try it out before paying for the main app.

Here is my laser cutter flowchart so far:

It’s made using the shapes provided within Grafio.

I was impressed with how easy it was to use, all the tools you need pop up when you tap on them. I think with a bit more time (I only spent about 15mins on the flowchart) I could make something more impressive.


Keynote (or how to avoid death by PowerPoint)

January 12, 2013

The Spring term started this week, and after such a lovely break it was a bit of a shock to the system! Fortunately we started with an inset day, where the teachers have meetings and training sessions. I had been asked to run a 1/2 hour session on using Socrative. So I spent some of my holiday writing a general knowledge quiz, presentation and handout.

I have mentioned Keynote before, but only in passing. And I suspect that this post is going to be quite simaler to last weeks post in Pages.

Keynote comes with a good selection of templates, although I tend to stick to the first 2 (black or white) for my lessons as I think they look better on my whiteboard.

As before it is really easy to add content, and editing things are the same as in Pages. The main addition is the ability to add animations, and this is where (in my opinion) keynote is better than PowerPoint. It is really easy to add subtle (or obvious) animations to give your presentation that certain something.

If you are interested in the resources I used in my Socrative inset, you can download a copy of the hand out and keynote from my Dropmark Folder (review to follow). And if you have Socrative, you can have a copy of my general knowledge quiz by using the code SOC-699726.


Stylish Posters

December 8, 2012

I recently spotted that Phoster had gone free in the App Store (if you don’t have ‘Apps Gone Free‘, then I highly recommend getting it, it saves me so much money!)

Phoster is an easy way to make stylish simple posters, quite useful when you want to advertise events in school.

You have a wide range of poster templates to choose from, all you need to do it add in an image (you only get to do 1 image, so choose wisely!) and tweak the text. Then you can save it to the integrated gallery, or export it to your camera roll.

Here is one of the posters I made, to advertise the YouTube channel.

I like it because it is simple, effective (and only took me about 5 mins to make).


Interactive Whiteboards (Part 1)

November 3, 2012

Now that I have managed to get my iPad to connect to my whiteboard (see my post about HDMI and VGA connections), I wanted to use my iPad in lessons more. Usually I would use an interactive whiteboard software, as well as PowerPoint on my computer, so I wanted an app that could allow me to write on the board during class. I am already using Keynote on my iPad instead of PowerPoint.

I have been collecting whiteboard apps for a while (I wait until they are reduced or free) and amassed quite a few to try out.

I started off with Doceri, which also have a computer desktop program that allows you to link iPad and computer together. I only have the basic iPad app at the moment. The iPad app is free.

It was relatively easy to put my sides together. You can import pictures, change background and have a variety of pens and shapes you can use. The main disadvantage is that you can't add type to the page, quite frustrating when it is hard to write anything other than giant words on the page!

It was easy to annotate my pictures and simple notes during class, and my pupils were quite amused to see words appearing on the whiteboard while I wrote on the iPad with my finger!

When using the app version, you do get a 'Doceri' watermark on each page, which can be removed with in-app purchase.

You can export your slide show into PDF and also a screencast video, as everything you do is recorded (you can even add audio if you want to).

Will I be using it again? Maybe – if they introduce the ability to also type on the slides, otherwise I can't have as much information on the screen as I would need.


VGA Connection (at last!)

October 13, 2012

You may remember my blog post about connecting my iPad to an HDMI whiteboard. I mentioned the difficulties I was having connecting to a similar board, but with a VGA connector.

Well this week I finally solved the problem (with the help from another teacher who is genius with all things technical – don't tell him I said this!)

So to connect your iPad through a VGA connector to a whiteboard you will need the following:

1. A VGA Manual Switching Box, I got mine from Amazon.

2. 2 VGA cables (I found some cheap on EBay)

3. A VGA to iPad adapter which you can get from the Apple store.

You then need to connect them together:

1 VGA cable goes from the VGA connector box to the projector (Beige Cable in the picture), the computer VGA cable goes in one of the ports (blue cable into port A), and your 2nd VGA cable goes out from the other port (white cable, port B).

You can then easily switch between the computer and your iPad by pressing either button A or B on the front of the box.

To connect your iPad you just need to connect your VGA adapter into the spare VGA cable (white in my case) and then into your iPad. Press button B and hey presto – iPad projected onto the screen!

I mentioned before that I have to be able to easily connect between 4 different boards (2 of which are HDMI and 2 are VGA). So once I have my adapters, I can easily connect into any of the boards that have the cables pre-set up.

I know it would be easier with an Apple TV, but I still have to connect the Apple TV into the various boards before I can project by AirPlay (and I am not buying 4 Apple TVs!).

One annoying thing with the cable set up, is that there is no sound. But I have (another) cable coming that should solve that problem, if it works then I will share it with you in another post.


Photography Tools (part 1)

September 29, 2012

I use a variety of tools to manipulate photos that I take. Especially when I want to consolidate photos together for blog posts or displays. One of the tools I like to use to do this is Pic Collage.

It is incredibly easy to use. You tap the screen to add photos, change background or add stickers (which can be purchased in app). You can rotate pictures using 2 fingers, and tapping a picture brings it to the foreground. Finished collages can be shared via email, standard social networking or just saved to photo library.

Here is an example of a photo collage (extra marks for working out where I took these photos!)


Alternative Ways of Presenting (Part 1: Prezi)

July 21, 2012

I love using Prezi, although it has taken me a while to get used to it, I am starting to use it more and more instead of PPT. What I like about it is the ability to 'zoom' into a presentation. It makes it very clear that we are going into more detail when you zoom further into an area. It can be tricky to get that balance between zoom around to wow your crowd and causing nausea. But Prezi have some good tutorials to help you when you make your first Prezi.

As a teacher I can join Prezi with my school email and I get to have an 'Edu Enjoy' account, which gives you the same perks as an 'Enjoy' account (500MB storage, own logo, private Prezis) but for free. Students can also do the same.

If you haven't come across Prezi before, then here is one of my Prezis (I used this to introduce the project my Yr 9's did for homework). As a testament to my lack of coding knowledge, I think this might be flash based (goodness knows I had fun trying to find out how to embed it). So amusingly it won't work on iPads!

There's also a Prezi app for iPad, it only allows you to view Prezis and do very simple editing. This came in handy when several of my pupils chose to use Prezi to present their projects, I could download their Prezis to my iPad, and then view them away from my computer as I marked them (admittedly in front of the TV).


I am hoping that in time the Prezi app will allow me to create Prezis on my iPad, as that will make my planning a lot easier. But for now at least I can view the Prezis I have and make simple adjustments.


How to use your iPad to teach from (part 1)

June 30, 2012

Almost all classrooms now have some form of smart board (we have Promethean Boards in my school). I knew that the iPad 2 had AirPlay Mirroring, and I thought it might be useful to show how I connect my iPad to the smart board without using an Apple TV (I am still investigating the potential of an Apple TV, but wanted to try a cheaper alternative first).


I tend to have lots of PPTs and Keynote presentations for my lesson, but because my pupils tend to be in the workshop working I don't use a smart board for its intended purpose as often as I would like. So for those non interactive lessons, it's faster to connect my iPad to the projector than it is to boot up the desktop that is attached already.


So to connect your iPad to a projector you will need the following

I connected the HDMI cable to the back of the projector and then fed it down through the trunking,so it would always be available.

When you are ready to show your presentation you need to connect the iPad through the HDMI connector and select the correct source on the projector (mine has a source button which you press, then select HDMI).

Because I was using Keynote and I also have an iPhone, I was able to use Keynote Remote which allows me to move through the presentation without having to go near the iPad. You have to be on the same wifi network for it to work.

Keynote remote was very easy to setup, you can see the opening screen and controlling screen here.

If your projector doesn't have an HDMI input, then you can also get a VGA connector. In my department teaching space we have 4 different classrooms. Frustratingly, 2 of them use HDMI and the other 2 use VGA. So I have both types of connectors, but as yet I haven't managed to purchase a VGA cable so I've not been able to test the VGA connectivity.